This project presents how to create and run an automated test written in C to debug an H-Bridge DC motor controller and a stepper motor controller with Digilent Analog Discovery 2 Logic Analyzer, Static I/O, Voltmeter, and Pattern Generator.
Digilent Analog Discovery 2 (134-6480) is a USB oscilloscope, logic analyzer, and multi-function instrument that allows users to measure, visualize, generate, record, and control mixed-signal circuits of all kinds. Driven by the free WaveForms software, Analog Discovery 2 can be configured to work as any one of several traditional test and measurement instruments including an Oscilloscope, Waveform Generator, Power Supply, Voltmeter, Data Logger, Logic Analyzer, Pattern Generator, Static I/O, Spectrum Analyzer, Network Analyzer, Impedance Analyzer, and Protocol Analyzer.


Featured products
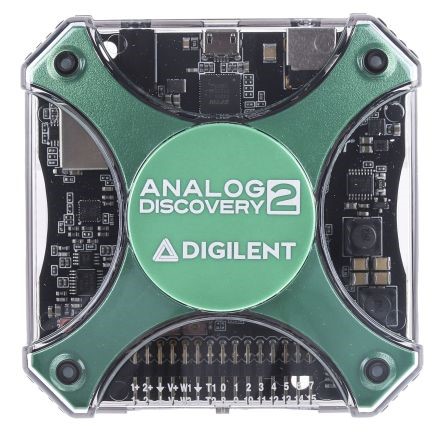
Digilent Analog Discovery 2 PC Based Oscilloscope, 30MHz, 2 Channels
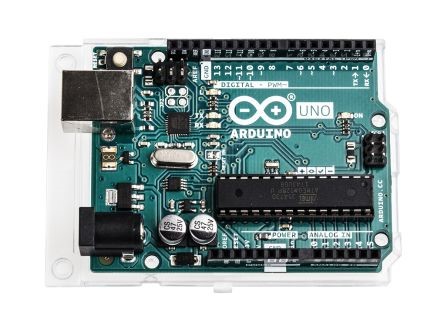
Arduino, Uno Rev 3
WaveForms is the free software application for Analog Discovery 2 and enables any of Analog Discovery 2 instruments including oscilloscope, logic analyzer, and function generator. WaveForms SDK (Software Development Kit) provides libraries and examples to write custom applications in C, Python, and more.
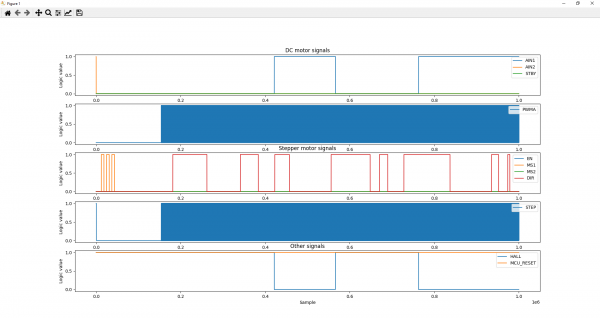
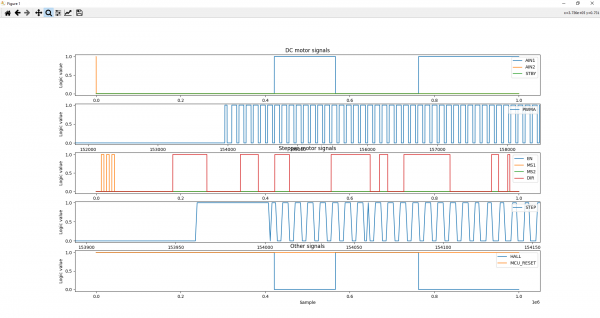
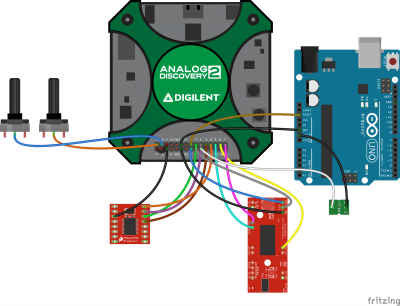
We want to debug an H-Bridge DC motor driver and a stepper driver are controlled by an Arduino UNO with Analog Discovery 2. Two potentiometers are used to set the speed of the DC motor and the position of the stepper. A Hall-effect sensor sends an interrupt signal to the MCU after every half-turn of the DC motor, and the direction of rotation is changed. We read volage across potentiometers. Both motors should be tested by sending digital control signals to the drivers, while the MCU is disabled, Then, we take the measurement after enabling the MCU.
Create an automated test application
Firstly, we create the header file (AD2_motor_debugger.h) to declare and define the following functions. We also include DWF Library (dwf.h) and other standard C libraries in the header file.
- Initialize Analog Discovery 2
- Reset Analog Discovery 2 instruments
- Write a value in Digital I/O pins (For Static I/O)
- Read voltage from an analogue input (For Voltmeter)
- Drive two motors (For Pattern Generator)
- Record digital signals (For Logic Analyzer)
- Save the data into .csv
The main source file (main.c), which is a wrapper, defines the structure of the project and two scripts, one in Python and one in MATLAB, for displaying the recorded data
We define connections and connect the Analog Discovery 2 at the start of the main source file. To test the motor drivers, the Arduino Uno must be turned off by setting its RESET pin to low. After that, the voltages on the potentiometers can be read, and the digital_write() and PWM generation functions can be used to test both motors with varying speeds, in both directions.
To record the signals coming from the Arduino, it must be turned on, by setting its RESET pin to logic high. We allocate memory for the number of samples (data_size) and buffer size (digital_data). After the acquisition, data loss/corruption should be checked.
The results of the test are displayed in the console window along with messages about the current operation.
Visualize the data in MATLAB or Python
Data can be exported in a file and visualized by running the plotting.m MATLAB script or the plotting.py Python program.